If you want cleaner lines, fewer gaps, and faster progress, these are diamond painting tips that actually improve your results—not generic advice. This guide focuses on real problems like crooked drills, weak glue, and static, and shows how to fix them while you work. Whether you're starting your first kit or already finishing larger canvases, this is a practical system with small details that make a big difference.
1. Start Small (30–40 cm max)
Large canvases look impressive, but they slow you down and amplify mistakes. Beginners often underestimate how much alignment matters, and on big canvases even small errors become visible. For your first project, choosing a smaller size makes it easier to learn placement, pressure, and control without frustration. A useful trick is to finish one small kit fully—including sealing or framing—so you understand the entire process before moving on to larger designs.

2. Choose Simpler Designs First
Highly detailed images with frequent color changes look great in previews but are harder to execute cleanly. Larger color blocks help you understand spacing and rhythm while placing drills. This reduces gaps and misalignment early on. If two colors look very similar on the chart, label your containers clearly—mix-ups here are one of the most common reasons for messy results.
3. Choose Round Drills for Your First Kit
Round drills are faster and more forgiving because they leave slight spacing between pieces. Square drills require precision and highlight every mistake in alignment, which can be frustrating on a first project. If you're choosing your first kit, go with round drills to build confidence and consistency. Once you’re comfortable with placement and straight lines, you can try square drills for a tighter, more detailed finish.

4. Work in Sections (Don’t Peel Everything)
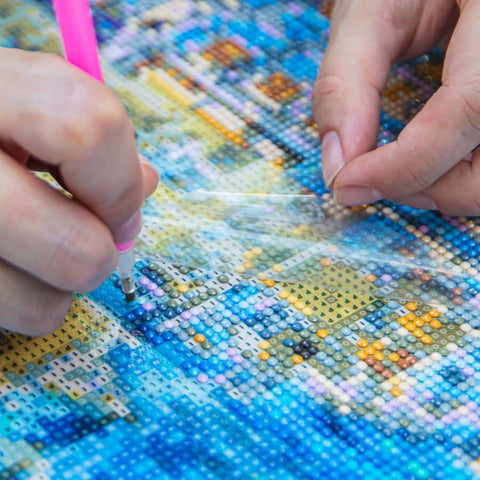
Peeling the entire protective film might feel faster, but it creates problems quickly. Dust sticks to exposed glue, your hand drags across adhesive, and placement becomes inconsistent. Work in small sections instead—this keeps the glue fresh and gives you better control. Some people cut the film into a grid with a craft knife so each section is easy to manage and doesn’t lift accidentally. If the original cover becomes hard to handle, replacing it with parchment paper makes sectioning cleaner and easier to reopen.
5. Fix Canvas Curl Before You Start
A curled canvas makes straight lines almost impossible. Even slight bending changes how drills sit and increases the chance of popping later. Flatten your canvas under books or use reverse rolling for a few hours. If edges still lift, secure corners lightly with tape while working to keep the surface stable.
6. Use a Light Pad for Better Accuracy
Symbols can be hard to read, especially on darker or highly detailed designs. A light pad improves visibility and reduces mistakes significantly. This is especially useful for similar-looking symbols or color-heavy areas. Lower the brightness slightly if glare makes symbols harder to read—too much light can wash out the print. In daylight, positioning your canvas near a window can sometimes give better contrast than artificial light.

7. Try the Checkerboard Method for Straighter Lines
Instead of placing drills side by side, leave small gaps and fill them later. This technique evens out spacing and prevents rows from drifting. It’s particularly effective with square drills where alignment is critical. If rows start shifting, gently nudge them back with tweezers before filling the gaps. For extra control with square drills, place the first row against a straight edge (like a ruler) to set a clean baseline before continuing.
8. Use a Multiplacer for Large Color Areas
Placing drills one by one works for detail, but it’s inefficient for large sections. A multiplacer lets you fill rows quickly while maintaining consistent spacing. It takes a bit of practice, but once mastered, it significantly speeds up your workflow. Press lightly and evenly—too much pressure causes uneven edges or drills tilting. When working with square drills, keep the multiplacer perfectly straight; even a slight angle creates visible misalignment across the row.

9. Fix Common Problems Early
Small issues become big ones if ignored. Drills not sticking, gaps, or static can ruin the final look if left unchecked. Press drills gently with a roller if they don’t stick well. Reduce static using a dryer sheet or by airing out drills before use. If drills keep popping, check for overfilled rows—removing one or two pieces often fixes the pressure problem. When glue feels too weak in certain spots, lightly pressing with a warm hand or leaving a book on the area overnight can help reactivate adhesion. If a section still won’t hold, a tiny amount of clear glue applied with a toothpick can secure problem areas without affecting the look.
If you want a deeper breakdown of the most common errors and how to fix them step by step, see our guide on how to avoid diamond painting mistakes while working on your canvas.
10. Replace Wax When It Stops Grabbing
Old wax reduces control and slows you down. If your pen struggles to pick up drills cleanly, it’s time to replace it. Many experienced users switch to alternatives like blue tack or nano tape for longer sessions. If wax becomes too sticky, tap it lightly on fabric to reduce excess grip and regain control. Keeping two pens ready—one with fresh wax and one slightly worn—helps switch quickly depending on how precise you need to be.
What Actually Improves Your Results
From experience after finishing multiple kits, the biggest improvement doesn’t come from tools but from habits. Working in small sections, keeping the canvas flat, and fixing mistakes early has a bigger impact than any accessory. Consistency in placement and pressure is what creates clean, sharp results.
Quick Setup That Makes a Difference
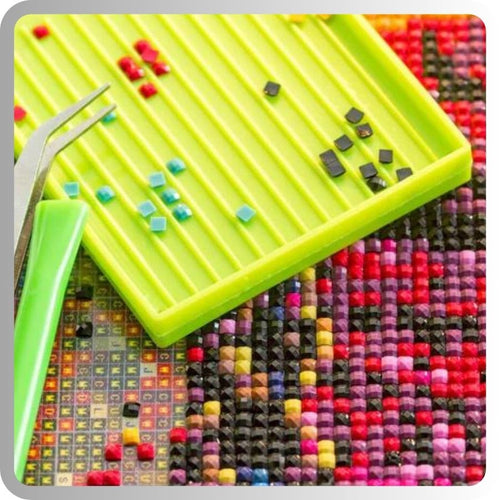
Your workspace directly affects your results when working on diamond painting kits. Poor lighting, lack of space, or disorganized drills slow you down and increase mistakes. A clean, well-lit surface with enough room for your canvas helps maintain focus. Keeping drills sorted by color and closing containers after use also prevents spills and static buildup. Using a tray with a slight shake to align drills before picking them up also speeds up placement and improves consistency.
Final Tip
If something looks slightly off, fix it immediately. In diamond painting, small alignment issues compound quickly. Correcting them early is faster and leads to a noticeably better final result.