If you’ve looked at a diamond painting kit and saw terms like “5D,” “full drill,” or “round vs square,” it can feel more complicated than it really is. In practice, these terms only describe how the drills (the small resin pieces) look and behave once you start placing them on the canvas.
This guide walks through what diamond drills are, what the common terms mean, and what actually matters when you’re choosing a kit. If you’re new to the hobby, you can also browse our diamond art kits to see how these differences show up in real designs.
How diamond painting works (quick context)
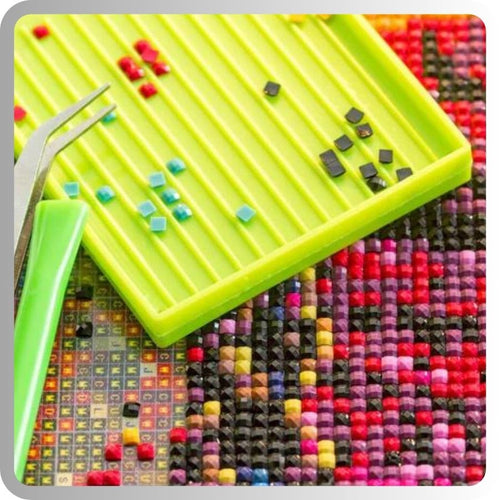
Before going deeper into drills, it helps to understand how the process works. You place small resin drills onto a sticky, symbol-coded canvas. Each symbol matches a color, and as you fill it in, the image gradually appears.
It’s similar to cross-stitch, but instead of thread, you’re working with faceted drills that reflect light.

What are diamond drills
Diamond drills (also called diamond art drills or dots) are the basic building blocks of every kit. They are small resin pieces cut with multiple facets so they catch light once placed on the canvas.
When you look at a finished piece up close, you don’t see “paint.” You see hundreds or thousands of drills aligned next to each other, creating the final image.
What is full drill diamond painting
One of the first terms people search for is what is full drill diamond painting. It simply means the entire canvas is covered with drills.
In a full drill kit, every section is filled, which gives a more complete and polished look. A partial drill kit leaves some areas printed without drills, usually for background elements.
Most people who try both end up preferring full drill because the result looks more consistent, even though it takes longer to finish.
What does 5D mean in diamond painting
Another common question is what does 5D mean in diamond painting. The “D” does not literally stand for a fixed number of dimensions or an exact facet count.
In most kits, 5D drills usually have around 15 to 20 facets in total, often described as 5 facets per side. This higher number of facets helps reflect more light, which is why 5D drills appear brighter and more sparkly.
The term “5D” is mostly a marketing label used across the industry. It signals higher sparkle compared to older 3D drills, but there is no strict universal standard across manufacturers.
Difference between 3D and 5D diamond painting
The difference between 3D and 5D diamond painting is mainly in how the drills reflect light. 5D drills typically have more facets, so they create stronger reflections and a sharper look. 3D drills have fewer facets and a softer shine.
In practice, most modern kits already use 5D drills, so you rarely need to choose between them. The term still appears in search because people use it to compare sparkle and overall visual effect.
Round drill vs square drill diamond painting
The bigger decision is usually between round drill diamond painting and square drills.
Round drills are easier to place. They don’t need perfect alignment, so you can work faster and with less frustration. That’s why they’re often recommended for beginners.
Square drills, on the other hand, fit tightly next to each other with no gaps. This creates a cleaner and more detailed final image. The trade-off is that placement has to be more precise.
From experience, square drills can feel slow at the beginning. If they’re even slightly misaligned, it’s visible. Round drills are more forgiving and let you build momentum faster.
Many people start with round drills and switch to square later once they want more detail and a cleaner finish.
What are AB drills in diamond painting
Another term you’ll see in kits is AB drills (Aurora Borealis). These are standard drills with a special iridescent coating that reflects extra light.
In practice, AB drills are used as accents on specific parts of the image (for example highlights, stars, or reflections). They stand out more than regular drills and add contrast to the finished piece.
They are not a different “type” of kit by themselves, but rather an addition inside a design. You can see examples in AB diamond painting kits where the extra shine is used to highlight specific details.
In some designs, too many AB drills can feel distracting rather than enhancing the image.

Other types of diamond painting drills
Besides standard round and square drills, you may come across other variations:
-
Special drills: larger or uniquely shaped pieces (teardrop, crystal, etc.) used mostly in partial drill designs
-
Crystal drills: transparent or glass-like drills that reflect light differently than resin ones
-
Composite diamond drills: mixed or layered drills designed to create a more textured effect
-
Glow in the dark drills: drills that absorb light and glow in low-light conditions, often used for night scenes or special effects
Glow in the dark designs are usually used as accents rather than full images. You can see examples in glow in the dark diamond painting kits where certain parts of the artwork become visible after dark.
These are less common in full drill kits and are mostly used for decorative or advanced designs.
Resin vs acrylic drills (quality difference)
Not all drills are made the same. Most modern kits use resin drills, but some cheaper kits use acrylic.
Resin drills are more consistent in shape, have sharper edges, and reflect light better. Acrylic drills can look duller and may have more defects or uneven cuts.
Small variations in drill size are normal in manufacturing, which is why perfect alignment is never 100% guaranteed.
In real use, this shows up as cleaner lines with square drills and less frustration when placing them.
Drill size and fit
Most diamond painting drills are around 2.5 mm in size, regardless of shape. What matters more than size is how consistently they are cut.
With square drills, even small inconsistencies can create gaps or misalignment. With round drills, the spacing hides these imperfections more easily.
Even with good drills, the final look also depends on the canvas printing. If the grid is slightly off, square drills won’t align cleanly.
Common issues with drills
A few problems show up often, especially in lower-quality kits:
-
Popping drills: square drills lifting or not staying flat due to tight placement or uneven sizing
-
Static: drills sticking together, especially in dry environments
-
Color inconsistency: slight shade differences within the same color batch
These don’t ruin the experience, but they affect how smooth the process feels and how clean the final result looks. If you want to avoid most of these issues, it helps to choose a well-reviewed kit or read guides like common diamond painting mistakes before starting.

Diamond art drills in real use
On paper, the differences between drills sound small. In practice, they change how the process feels.
If you start with round drills, the process is faster and more relaxed. You can place drills without worrying about perfect spacing. With square drills, the result looks cleaner, but you’ll spend more time adjusting alignment, especially in the first few sessions.
Working in small sections also matters more than people expect. It keeps the adhesive clean and prevents dust from reducing stickiness over time.
Summary
Diamond painting drills define both the look of the final image and how the process feels while you’re working. If you want something easy to start with, round drills are the safer choice. If you care more about detail and a seamless finish, square drills are worth the extra effort.
For most modern kits, a 5D full drill setup is the standard, which already gives a strong balance between detail and visual impact.